


Acronis Migrate Easy 7 Review and "clone disk" step-by-step instructions. Transfer the whole system to a new drive in simple steps.


..........$33.99


Awards


e-mail:
cs@cleverbridge.com
phone:
+1-866-522-6855
(Intl.: +1-312-922-8693)
fax:
+1-312-376-1854
address:
cleverbridge
360 N. Michigan Ave.
Suite 1900
Chicago, IL, 60601-3805, USA
cs@cleverbridge.com
phone:
+1-866-522-6855
(Intl.: +1-312-922-8693)
fax:
+1-312-376-1854
address:
cleverbridge
360 N. Michigan Ave.
Suite 1900
Chicago, IL, 60601-3805, USA
Acronis Migrate Easy 7 Review
Acronis Migrate Easy 7 helps you to transfer existing partitions to a new hard drive, make this drive bootable and create partitions on the destination drive.
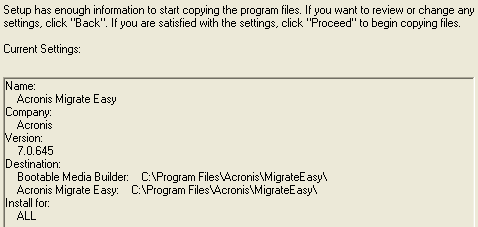
The installation file is about 42 Mb and the latest build of the program is 7.0.645 as you can see on the screenshot:
Acronis Migrate Easy 7 helps you to transfer existing partitions to a new hard drive, make this drive bootable and create partitions on the destination drive.
The installation file is about 42 Mb and the latest build of the program is 7.0.645 as you can see on the screenshot:
The installation took about half a minute, after that you can register the software on Acronis website to get free technical support and download free updates.
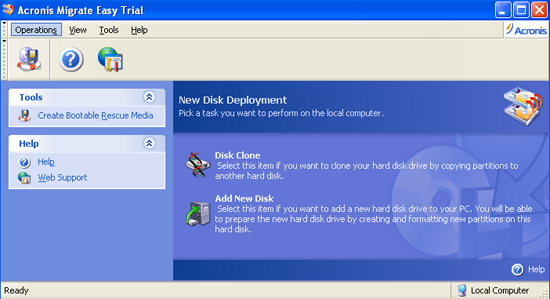
The software user interface is very intuitive and simple, actually there are no many options here. Here is the screenshot of the main window:
The software user interface is very intuitive and simple, actually there are no many options here. Here is the screenshot of the main window:
Acronis Migrate Easy 7 main options:
- Disk Clone. Disk clone has two modes - automatic and manual. Automatic disk clone will transfer the source hard drive to the destination hard drive and make it bootable, so your operating system, all applications, settings, e-mail accounts and data will be transferred to a new drive. Partitions size will be automatically resized to fit the new hard drive size. Manual mode will make it possible to adjust partition size on both drives and create new partitions. You will have 3 scenarios of data transfer in manual mode:
- Create a new partition layout. A new partition layout will be created, the old disk layout will be destroyed on the old drive and will not have an access to data any more. You will be able to access all your data after the clone process on the new drive.
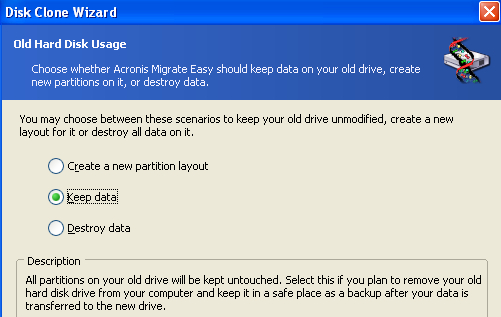
- Keep data. All your data on the old hard drive will be kept untouched after the clone process. You may use this option in case you want to keep the old drive as a backup copy. Note: I advise you to use this option in case clone process fails.
- Destroy data. All data on the old hard disk will be completely destroyed and you wont be able to recover it as each sector will be zeroed. You may use this option as an additional security and in case you are not planning to use the old drive in future.
- Disk Clone. Disk clone has two modes - automatic and manual. Automatic disk clone will transfer the source hard drive to the destination hard drive and make it bootable, so your operating system, all applications, settings, e-mail accounts and data will be transferred to a new drive. Partitions size will be automatically resized to fit the new hard drive size. Manual mode will make it possible to adjust partition size on both drives and create new partitions. You will have 3 scenarios of data transfer in manual mode:
- Create a new partition layout. A new partition layout will be created, the old disk layout will be destroyed on the old drive and will not have an access to data any more. You will be able to access all your data after the clone process on the new drive.
- Keep data. All your data on the old hard drive will be kept untouched after the clone process. You may use this option in case you want to keep the old drive as a backup copy. Note: I advise you to use this option in case clone process fails.
- Destroy data. All data on the old hard disk will be completely destroyed and you wont be able to recover it as each sector will be zeroed. You may use this option as an additional security and in case you are not planning to use the old drive in future.
Manual mode also has 3 ways of moving methods:
- As is. The old drive will be transferred to a new one as is without any change in partition size, so if your new drive has a bigger size you will have unallocated space after clone process.
- Proportional. The original partition sizes will be scaled according to the new drive size. So in case you have a bigger destination drive the partitions will be enlarged proportionally.
- Manual. You can set partition size manually.
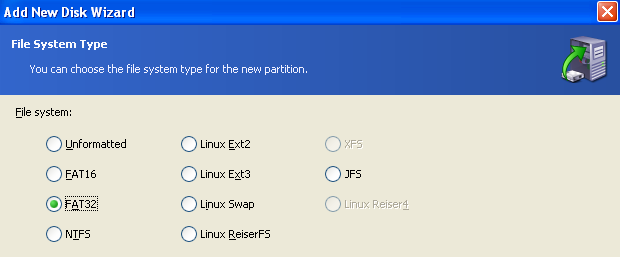
- Add new disk. This option allows you to configure partitions on both hard drives - source and destination. If a new drive is not formatted so there is unallocated space on it you may create partition(s) on it and select file system type. The supported file system types are the following: FAT16, FAT32, NTFS, Linux Ext2, Ext3, Swap, ReiserFS, JFS.
- As is. The old drive will be transferred to a new one as is without any change in partition size, so if your new drive has a bigger size you will have unallocated space after clone process.
- Proportional. The original partition sizes will be scaled according to the new drive size. So in case you have a bigger destination drive the partitions will be enlarged proportionally.
- Manual. You can set partition size manually.
- Add new disk. This option allows you to configure partitions on both hard drives - source and destination. If a new drive is not formatted so there is unallocated space on it you may create partition(s) on it and select file system type. The supported file system types are the following: FAT16, FAT32, NTFS, Linux Ext2, Ext3, Swap, ReiserFS, JFS.
After that you should select the type of partition: logical or primary. Note that only primary partitions can be bootable, in case you want to use the partition only for data you should select logical partition.
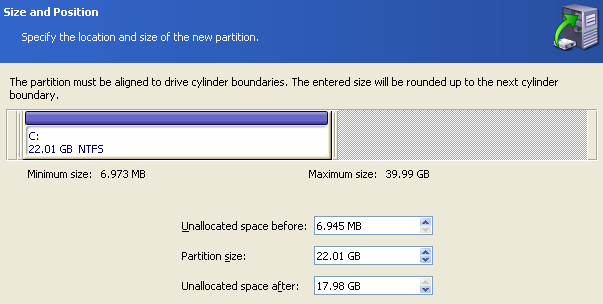
Later you may specify the size of partition, to do so just enter the appropriate size in partition size field.
Later you may specify the size of partition, to do so just enter the appropriate size in partition size field.
- Create bootable rescue media. You can create Acronis bootable disc to clone the drive under Linux. I personally advise you to clone only under Acronis bootable disc to overcome any possible issues. Clone process may fail under Windows as it can be interrupted by any other running processes.
You may place the following components into Acronis bootable disc:
- Full version. This version includes drivers for USB/PC, Card/SCSI hard drives
- Safe version. This version doesnt include drivers mentioned in full version. You should use it only in case full version bootable disc cannot boot.
You may place the following components into Acronis bootable disc:
- Full version. This version includes drivers for USB/PC, Card/SCSI hard drives
- Safe version. This version doesnt include drivers mentioned in full version. You should use it only in case full version bootable disc cannot boot.
Read also
Step by step instructions how to clone a drive to a bigger drive
Acronis True Image Home 2013 Review
Acronis Backup and Recovery 11 Workstation Review
Acronis Backup and Recovery 11 Advanced Workstation Review
Acronis Backup and Recovery 11 Server for Windows Review
Acronis Backup and Recovery 11 Advanced Server for Windows Review
Step by step video guide how to clone a drive
Like this review? Share it with your friends!