Acronis Step-By-Step Instructions: Create Acronis Bootable USB Flash Drive, Deploy Image, Convert .tib to .vhd
Create Acronis bootable USB flash drive
When creating Acronis Bootable Media on a flash drive, Acronis products do not mark partition on the flash drive as active. As a result, one cannot boot from the flash drive with Acronis Bootable Media.
These instructions apply to:
* Windows Vista
* Windows Server 2008
1. Insert your flash drive;
2. Hit Win-R and type cmd to open a command-line;
3. Type diskpart to run Windows DiskPart utility:
4. Type list disk to list all disks attached to the machine:
5. Type select disk [number] to select your flash drive:
6. Type clean to remove any formatting from the selected disk:
7. Type create partition primary:
8. Type select partition 1 to select the only partition, which you now have on the flash drive:
9. Type active to mark the partition as active:
10. Type format fs=fat32 to format the disk in FAT32 (otherwise the drive will not be bootable):
11. Type assign to assign a drive letter:
12. Type exit to exit Windows DiskPart utility:
13. Run your Acronis product;
14. Pick Tools -> Create Bootable Rescue Media;
15. Follow all steps of the wizard and select your USB flash drive as media.
Windows XP:
1. Download the Forensic Acquisition Utilities from
http://www.gmgsystemsinc.com/fau/
2. Unpack the downloaded ZIP archive;
3. Place installation file of Acronis product in the same folder where you unpacked the ZIP archive:
4. Open the command-line (Start->run->cmd)
5. Issue the following commands:
cd [drive letter]:\fau\fau.x86
dd if=[drive letter]:\[name of the .dd file] of=\\.\[flash drive letter]: –localwrt
where
[drive letter] – Drive letter and path to the file on your hard disk
[name of the .dd file] – Name of the file you have downloaded on Step 3
[flash drive letter] – Letter of your flash drive that you would like to use as Acronis Bootable Media
Example
cd c:\fau\fau.x86
dd if=c:\atis_8115_s_e.dd of=\\.\e: –localwrt
6. Make sure that the partition is active using Disk Management (Start->Run->diskmgmt.msc);
7. Detach the USB flash drive.
You can now boot your machine from it.
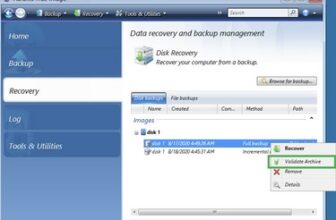
Deploy image with Acronis Snap Deploy 3.0
Instructions on how to deploy your system to another computer, using a third workstation computer and Acronis Universal Deploy 3 for PC and Acronis Universal Deploy.
1. For this operation you will need to install the following components
included in the Acronis Snap Deploy installation file:
– Acronis License Server
– Acronis Snap Deploy Management
– Acronis OS Deploy Server
Also you need to install Acronis Universal Deploy from a separate setup file.
Install all of the above software on the third computer (the one you do not either backup or restore).
2. Import the license for Acronis Snap Deploy 3 and Acronis Universal Deploy to the License Server from the Management Console. You can save the license numbers you wish to import in a text file first, and then import them by selecting the file in the further wizard.
3. You will need to create the master image of your master computer (the one you deploy from). For this click on “Create Master Image” in the Management Console and follow the wizard choosing “On the local machine using bootable media”, Acronis Standalone Deployment and Acronis Master Image Creator in the Rescue Media content. Pick USB flash drive (you should have the USB flash drive attached to the third computer at this point) or ISO-file as a bootable media. Wait until the media is created. If you choose to create ISO-file, burn it to CD or DVD.
Attach an external USB hard drive to your master computer to use it to store your master image. Boot your master computer from the created bootable media, setting the proper BIOS configuration. Load Acronis GUI environment. Click on “Acronis Master Image Creator”. Check all of the partiotions you want to deploy. Specify the location for the Master Image to store (external USB hard drive).
4. When the Master Image is created, load into Windows environment again. Now, attach the external USB hard drive with the master image on it to your target computer (the one you want to deploy to). Boot the target computer from the created bootable media. Click on “Acronis Standalone Utility”. Browse for the master image and start the deployment process.
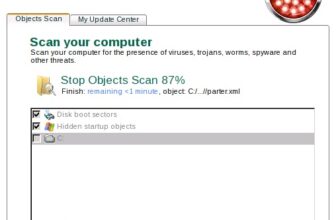
Convert .tib to .vhd and import to Hyper V
Step-by-step instructions on how to convert a backup archive (*.tib) to virtual hard disk (*.vhd) and import it to Hyper-V
This document applies to:
* Acronis True Image Echo Server for Windows
* Acronis True Image Echo Enterprise Server
* Acronis True Image Echo Workstation
First of all you need to create a full backup of your system partition or the whole hard disk drive. Then you should convert the backup to a virtual hard disk. After this you can import the virtual hard disk to Hyper-V.
Step 1: Converting backup archive (*.tib) to virtual hard disk (*.vhd)
1. Run Acronis True Image. Click Tools -> Convert Backup to Virtual Disk:
2. Conversion to Virtual Disk Wizard will start:
3. Select the backup archive that you will convert to *.vhd format:
4. Select Microsoft Virtual PC:
5. Specify the location where you would like to save the *.vhd file:
6. Click Proceed to start the conversion:
7. Conversion will start:
Step 2: Importing virtual hard disk (*.vhd) to Hyper-V
1. Run Hyper-V Manager:
2. Click New -> Virtual Machine:
3. Set the location where the virtual machine will be stored. You can use default settings or change them:
4. Specify the amount of memory for the virtual machine:
5. Configure your network adapter:
6. Click Use an existing virtual hard disk. Then click Browse and select the location where the *.vhd file is stored:
7. Click Finish:
Hyper-V virtual machine is ready.